here is a brief guide to fitting a supercharger to an astra g
part required for a standard fit (stage 1)


when fitting the inlet manifold and supercharger there are many parts that need removing


i pre made the injector plugs up with some wire ready for extending the main loom they were color coded to match the main loom but you can use what ever color just be sure to label them up with a pen and masking tape


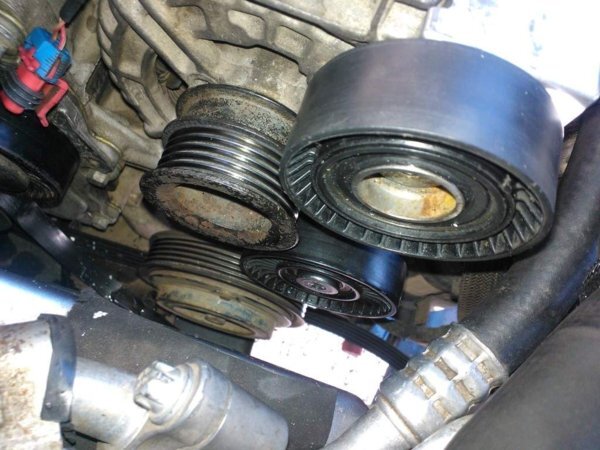
the alternator will need the rear cover removing and one bolt cutting off short then also to fit a suppressor
you can get one from a scrappy off the rear of a z22se then just drill the hole out to fit the bolt the wire end of the suppressor will need to be earthed on the top screw
there is no difference in size on the 100 amp vs 120 amp (100 amp without heated seats) (120 amp fitted to most 2003 onwards)


here you can see the wire from the suppressor going to earth and the front bolt cut to make sure it won't short on the manifold
top tip: when fitting the alternator use 4 x M10 nuts on the block side to bring the alternators position further out")


now back to the install
1st fit the lower manifold bracket
you will need some longer M8 bolts and be sure to refit the earth tags to the bolts

A/C pump
if your keeping the A/C this next step will need to be done if you're not keeping the A/C you can move on to the next bit
here you can see the a/c pump has been moved out on some collars i made up
the issue with keeping the A/C is the pipe is a right funny shape and always in the way
i removed the top plastic support from the radiator fan case and then bent the a/c pipe over and down to miss the inlet manifold be sure to do this slow you dont want to kink or crack the pipe
and with the extra collars i had to make new longer bolts from all thread bar and some nuts


right so now the A/C pump is dealt with or not
you can fit the inlet manifold with the alternator not fitted
the 2 M6 manifold studs will need to be removed to get the inlet down into place
new M6 pins and washers will need to be used when fitting the inlet as there a different length
dont forget to install the lower bracket bolt to support the weight of the inlet and charger

next step is to fit the z20let injectors in the z22se fuel rail
top tip: use bum lube (aka vaseline) on the injector O rings to aid there fitment
use the z22se injector clips to hold the z20let injectors in to the rail
heres a pic of before the swap (upper z22se lower z20let)

install the wire extensions and plugs to the rail and injectors then fit the rail to the engine the plastic of the plug on injector #3 is close to the manifold but will sit fine once installedthe new map sensor and the fuel vent wiring will also need to be extended to where ever you move the ecu to

now fit the alternator with the M10 nuts on the block and the longer bolts and belt bracket from CS
dont forget to fit the battery power cable and the plug to the alternator
for use with out A/C the bracket can stay as it is for use with A/C you will need to add a 2nd idler pulley to drive the alternator

without the 2nd idler when keeping the A/C the belt won't touch the alternator pulley so you need to source a z22se tensioner and use the pulley from it to push the belt back on to the alternator

using the slot in the CS bracket some washers and a nylock nut i was able to make the 2nd pulley system work giving the alternator drive
top tip: be creative the bolt in the top pulley came from the pulley fitted to the stock USA bracket

fitting the new map sensor requires some tape putting on the stub then the rubber fitting over the tape as the hole in the manifold is too big without the tape
the metal bracket from the map sensor on the supercharger can be used to hold the new map sensor in place
fit the supercharger gasket then lower the supercharger on to the manifold it will take a few tries to get it in but it will fit the front bolts on the charger are a right pain to fit i swapped the cap head bolts for som M8 bolt then used a small socket set with the universal joint to tighten the front bolts up
the top coolant hose was taken from a vectra C z22se it comes with a plastic tee the tee was squished in a vice to remove the metal band leaving the pipe free for me to use
top tip : be creative

the fuel line over the charger will need to be bent to miss the charger some people cut the pipe and use rubber fuel line and 2 jubilee clips at the ends of the rubber i wanted to try and keep it oem looking
the air filter is a halfords special £22 ripspeed
the rocker cover breather is just vented to atmosphere atm will be fitting it to the air filter at some point
the battery location most fit it in the boot but with the hole OEM look i wanted it up front
had to get a smaller size battery and modify the tray some
when getting your belt it's easy to just get a length of string wrap it round the pulleys tie it off then measure the string then go and buy the closet belt to the measurement mine was 5pk 1453 but i ended up using a 5pk 1463
and if your using the LSJ throttle body you will need to swap the wires in the T/B plug to make it work
if your using the z22se T/B all you will require is the adapter plate to make it fit the supercharger

the ecu will need to be sent to CS for supercharger base map to get you running
this is a brief guide to show the basic way to fit the supercharger some parts are not covered but any questions i should beable to answer here
thanks for looking
part required for a standard fit (stage 1)
- supercharger
- inlet manifold
- manifold bracket
- z20let injectors
- 2bar map sensor (courtney sport)
- bosch injector plugs
- K'n'N filter
- LSJ throttle body (optional)
- belt pulley and bracket (courtney sport)
- Manifold Gasket z20net (vauxhall)
- various nuts bolts
- wire for extending the loom

when fitting the inlet manifold and supercharger there are many parts that need removing
- battery
- battery tray
- air box
- inlet pipe
- fuel lines
- fuel rail + injectors
- inlet manifold
- ecu + loom

i pre made the injector plugs up with some wire ready for extending the main loom they were color coded to match the main loom but you can use what ever color just be sure to label them up with a pen and masking tape

the alternator will need the rear cover removing and one bolt cutting off short then also to fit a suppressor
you can get one from a scrappy off the rear of a z22se then just drill the hole out to fit the bolt the wire end of the suppressor will need to be earthed on the top screw
there is no difference in size on the 100 amp vs 120 amp (100 amp without heated seats) (120 amp fitted to most 2003 onwards)

here you can see the wire from the suppressor going to earth and the front bolt cut to make sure it won't short on the manifold
top tip: when fitting the alternator use 4 x M10 nuts on the block side to bring the alternators position further out

now back to the install
1st fit the lower manifold bracket
you will need some longer M8 bolts and be sure to refit the earth tags to the bolts
A/C pump
if your keeping the A/C this next step will need to be done if you're not keeping the A/C you can move on to the next bit
here you can see the a/c pump has been moved out on some collars i made up
the issue with keeping the A/C is the pipe is a right funny shape and always in the way
i removed the top plastic support from the radiator fan case and then bent the a/c pipe over and down to miss the inlet manifold be sure to do this slow you dont want to kink or crack the pipe
and with the extra collars i had to make new longer bolts from all thread bar and some nuts

right so now the A/C pump is dealt with or not
you can fit the inlet manifold with the alternator not fitted
the 2 M6 manifold studs will need to be removed to get the inlet down into place
new M6 pins and washers will need to be used when fitting the inlet as there a different length
dont forget to install the lower bracket bolt to support the weight of the inlet and charger
next step is to fit the z20let injectors in the z22se fuel rail
top tip: use bum lube (aka vaseline) on the injector O rings to aid there fitment
use the z22se injector clips to hold the z20let injectors in to the rail
heres a pic of before the swap (upper z22se lower z20let)
install the wire extensions and plugs to the rail and injectors then fit the rail to the engine the plastic of the plug on injector #3 is close to the manifold but will sit fine once installedthe new map sensor and the fuel vent wiring will also need to be extended to where ever you move the ecu to
now fit the alternator with the M10 nuts on the block and the longer bolts and belt bracket from CS
dont forget to fit the battery power cable and the plug to the alternator
for use with out A/C the bracket can stay as it is for use with A/C you will need to add a 2nd idler pulley to drive the alternator
without the 2nd idler when keeping the A/C the belt won't touch the alternator pulley so you need to source a z22se tensioner and use the pulley from it to push the belt back on to the alternator
using the slot in the CS bracket some washers and a nylock nut i was able to make the 2nd pulley system work giving the alternator drive
top tip: be creative
the bolt in the top pulley came from the pulley fitted to the stock USA bracket
fitting the new map sensor requires some tape putting on the stub then the rubber fitting over the tape as the hole in the manifold is too big without the tape
the metal bracket from the map sensor on the supercharger can be used to hold the new map sensor in place
fit the supercharger gasket then lower the supercharger on to the manifold it will take a few tries to get it in but it will fit
the front bolts on the charger are a right pain to fit i swapped the cap head bolts for som M8 bolt then used a small socket set with the universal joint to tighten the front bolts upthe top coolant hose was taken from a vectra C z22se it comes with a plastic tee the tee was squished in a vice to remove the metal band leaving the pipe free for me to use
top tip : be creative
the fuel line over the charger will need to be bent to miss the charger some people cut the pipe and use rubber fuel line and 2 jubilee clips at the ends of the rubber i wanted to try and keep it oem looking
the air filter is a halfords special £22 ripspeed
the rocker cover breather is just vented to atmosphere atm will be fitting it to the air filter at some point
the battery location most fit it in the boot but with the hole OEM look i wanted it up front
had to get a smaller size battery and modify the tray some
when getting your belt it's easy to just get a length of string wrap it round the pulleys tie it off then measure the string then go and buy the closet belt to the measurement mine was 5pk 1453 but i ended up using a 5pk 1463
and if your using the LSJ throttle body you will need to swap the wires in the T/B plug to make it work
if your using the z22se T/B all you will require is the adapter plate to make it fit the supercharger
the ecu will need to be sent to CS for supercharger base map to get you running
this is a brief guide to show the basic way to fit the supercharger some parts are not covered but any questions i should beable to answer here
thanks for looking
Attachments
Last edited:


