KevinH
Senior Member
Time to renew the trailing arm upper ball joints (aka rose bushes) on my Vectra B SRi as they are still the originals that left the factory over 15 years ago.
Below is a list of genuine GM parts purchased from AutoVaux:
2 x 90496700 Ball Joint, Control Arm - £ 18.57 each inc VAT
2 x 90539298 Screw, Hex HD M12 x 80 Control Arm to Rear Suspension Arm - £ 1.67 each inc VAT
2 x 90496714 Locking Plate (with Nut), Control Arm to Rear Suspension Arm - £ 1.58 each inc VAT
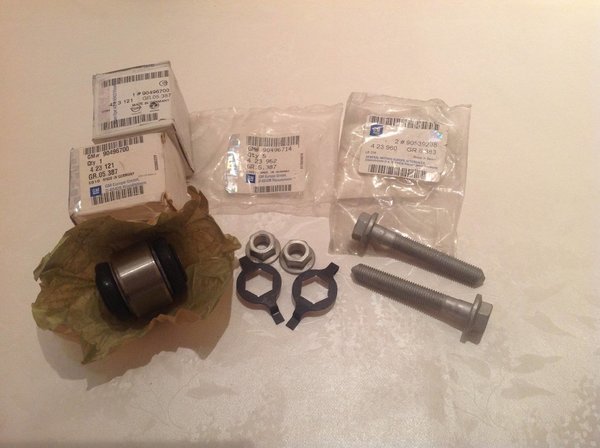
(Parts showing locking plates separated from nuts for illustration - they were attached when delivered).
The tools I used for the job were:
Medium size flat blade screwdriver
Long nosed pliers
18mm 1/2" socket and ratchet
5" extension bar
18mm ring/open end spanner
14mm 3/8" socket and ratchet
Torque wrench
Trolley jack
Axle stands
Small wire brush and emery paper
(A plentiful supply of coffee and a swear box is handy too )
)
I had to purchase a bush remover/installer tool which allows the bushes to be removed in situ without removing the trailing arm and decided on a Sealey VS4460 which is a professional tool (not made any more) and luckily found a brand new one on eBay for £40, they are usually about £150 new. I also had to purchase a 27mm ratchet spanner to turn the force nut on the tool.
(For info - other bush tools available are: Sealey VS721, Laser 3800, Draper 64622 and Franklin TA991)
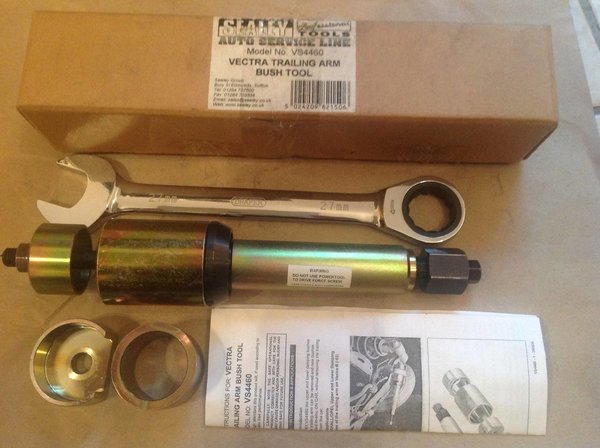
(Sealey VS4460 and 27mm ratchet spanner for force nut)
After jacking up the LH rear, removing the wheel and supporting the car on an axle stand, the first task was to remove the existing locking plate located over the nut using a screwdriver and long nose pliers by twisting and pulling (they will distort and are likely to break which is why I bought new ones which includes the nuts).
Then undo the nut and screw with the 18mm socket, ratchet and extension on the screw and the 18mm ring spanner on the nut (they are tight so I had previously sprayed them with PlusGas and left them for 15 minutes). Once undone and removed, lift and release the rear upper control arm and slide a block of wood in between the two arms to hold it out of the way.
Ensure the force screw on the tool is lubricated using Molybdenum Disulphide grease, then assemble the tool using the bush removal cups and force screw through the old bush making sure it's aligned then hand tighten. Using the 27mm ratchet spanner gradually tighten the force nut while holding the hexagon on the force screw. Again the bush will be tight, and considerable force will be required, but use progressive force and eventually the bush will 'crack' from its location in the trailing arm then continue winding the nut to press the bush out completely.
Clean up the trailing arm bush location using a small wire brush and use some fine emery paper on the spherical inner surface where the new bush is pressed in. I then wiped the surface with some silicon oil to aid installation of the new bush.
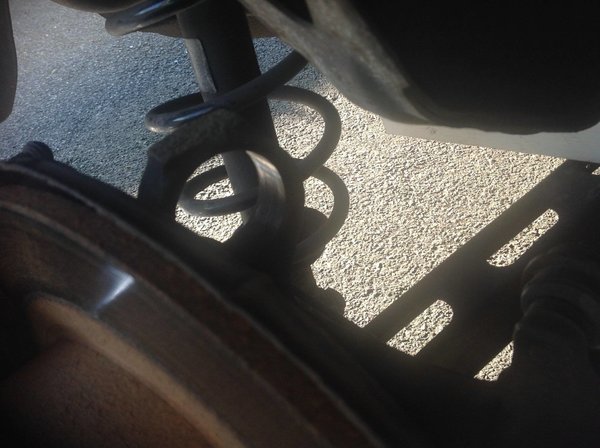
(O/S trailing arm aperture ready for new bush)
Assemble and align the bush tool with installation cups and new bush around the aperture in the trailing arm and hand tighten. Then gradually tighten the force nut to press the new bush into the trailing arm ensuring the bush is entering the aperture squarely. Keep turning the nut until the face of the cup reaches the trailing arm face so that both ends of the bush are located evenly in the trailing arm.
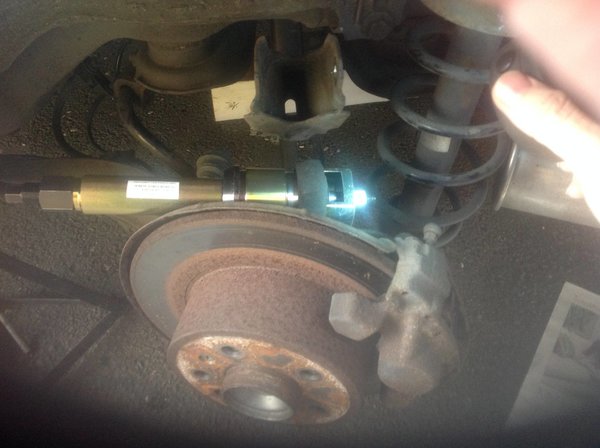
(N/S bush installation with tool located)
Remove the block of wood holding the upper control arm up, then push the arm back over the trailing arm and bush. Insert the screw/bolt through the bush and locate the nut ready for tightening.
Tip: I found that locating the screw and pushing all the way through first, then tapping it back out to the point the end of screw was just visible allowed me to locate the nut with the locking plate already over it (which is how they come when ordered) into the control arm, by slotting it in the small hole then sliding it over the end of the control arm.
Tighten the screw with the torque wrench to 90 Nm (66 lbf ft) + 60° + 15°.
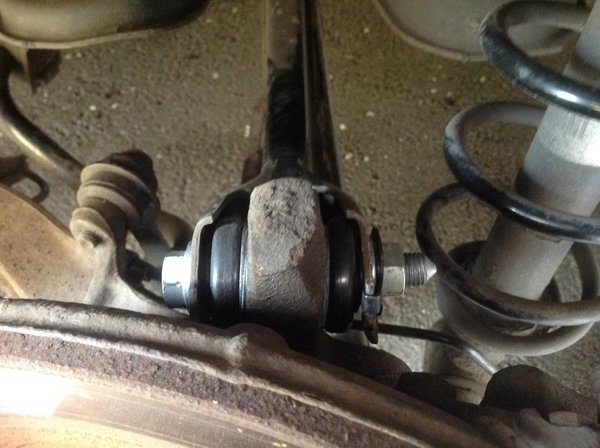
(N/S bush installed, upper arm attached and bolt tightened to specified torque)
Replace the road wheel, tighten wheel bolts, lower car and torque wheel bolts to 110 Nm (81 lbf ft)
Now the same for the other side !
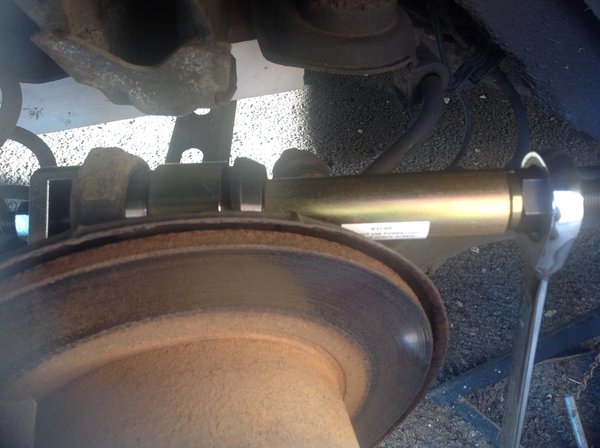
(O/S bush being installed)
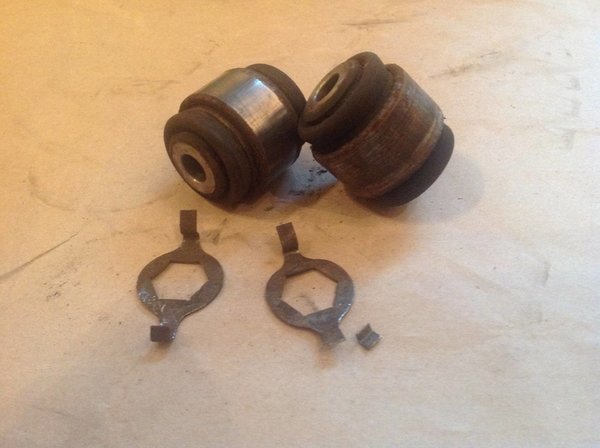
(Worn bushes and the locking plates - one of them broke )
)
Below is a list of genuine GM parts purchased from AutoVaux:
2 x 90496700 Ball Joint, Control Arm - £ 18.57 each inc VAT
2 x 90539298 Screw, Hex HD M12 x 80 Control Arm to Rear Suspension Arm - £ 1.67 each inc VAT
2 x 90496714 Locking Plate (with Nut), Control Arm to Rear Suspension Arm - £ 1.58 each inc VAT

(Parts showing locking plates separated from nuts for illustration - they were attached when delivered).
The tools I used for the job were:
Medium size flat blade screwdriver
Long nosed pliers
18mm 1/2" socket and ratchet
5" extension bar
18mm ring/open end spanner
14mm 3/8" socket and ratchet
Torque wrench
Trolley jack
Axle stands
Small wire brush and emery paper
(A plentiful supply of coffee and a swear box is handy too
I had to purchase a bush remover/installer tool which allows the bushes to be removed in situ without removing the trailing arm and decided on a Sealey VS4460 which is a professional tool (not made any more) and luckily found a brand new one on eBay for £40, they are usually about £150 new. I also had to purchase a 27mm ratchet spanner to turn the force nut on the tool.
(For info - other bush tools available are: Sealey VS721, Laser 3800, Draper 64622 and Franklin TA991)

(Sealey VS4460 and 27mm ratchet spanner for force nut)
After jacking up the LH rear, removing the wheel and supporting the car on an axle stand, the first task was to remove the existing locking plate located over the nut using a screwdriver and long nose pliers by twisting and pulling (they will distort and are likely to break which is why I bought new ones which includes the nuts).
Then undo the nut and screw with the 18mm socket, ratchet and extension on the screw and the 18mm ring spanner on the nut (they are tight so I had previously sprayed them with PlusGas and left them for 15 minutes). Once undone and removed, lift and release the rear upper control arm and slide a block of wood in between the two arms to hold it out of the way.
Ensure the force screw on the tool is lubricated using Molybdenum Disulphide grease, then assemble the tool using the bush removal cups and force screw through the old bush making sure it's aligned then hand tighten. Using the 27mm ratchet spanner gradually tighten the force nut while holding the hexagon on the force screw. Again the bush will be tight, and considerable force will be required, but use progressive force and eventually the bush will 'crack' from its location in the trailing arm then continue winding the nut to press the bush out completely.
Clean up the trailing arm bush location using a small wire brush and use some fine emery paper on the spherical inner surface where the new bush is pressed in. I then wiped the surface with some silicon oil to aid installation of the new bush.

(O/S trailing arm aperture ready for new bush)
Assemble and align the bush tool with installation cups and new bush around the aperture in the trailing arm and hand tighten. Then gradually tighten the force nut to press the new bush into the trailing arm ensuring the bush is entering the aperture squarely. Keep turning the nut until the face of the cup reaches the trailing arm face so that both ends of the bush are located evenly in the trailing arm.

(N/S bush installation with tool located)
Remove the block of wood holding the upper control arm up, then push the arm back over the trailing arm and bush. Insert the screw/bolt through the bush and locate the nut ready for tightening.
Tip: I found that locating the screw and pushing all the way through first, then tapping it back out to the point the end of screw was just visible allowed me to locate the nut with the locking plate already over it (which is how they come when ordered) into the control arm, by slotting it in the small hole then sliding it over the end of the control arm.
Tighten the screw with the torque wrench to 90 Nm (66 lbf ft) + 60° + 15°.

(N/S bush installed, upper arm attached and bolt tightened to specified torque)
Replace the road wheel, tighten wheel bolts, lower car and torque wheel bolts to 110 Nm (81 lbf ft)
Now the same for the other side !

(O/S bush being installed)

(Worn bushes and the locking plates - one of them broke
Last edited: